
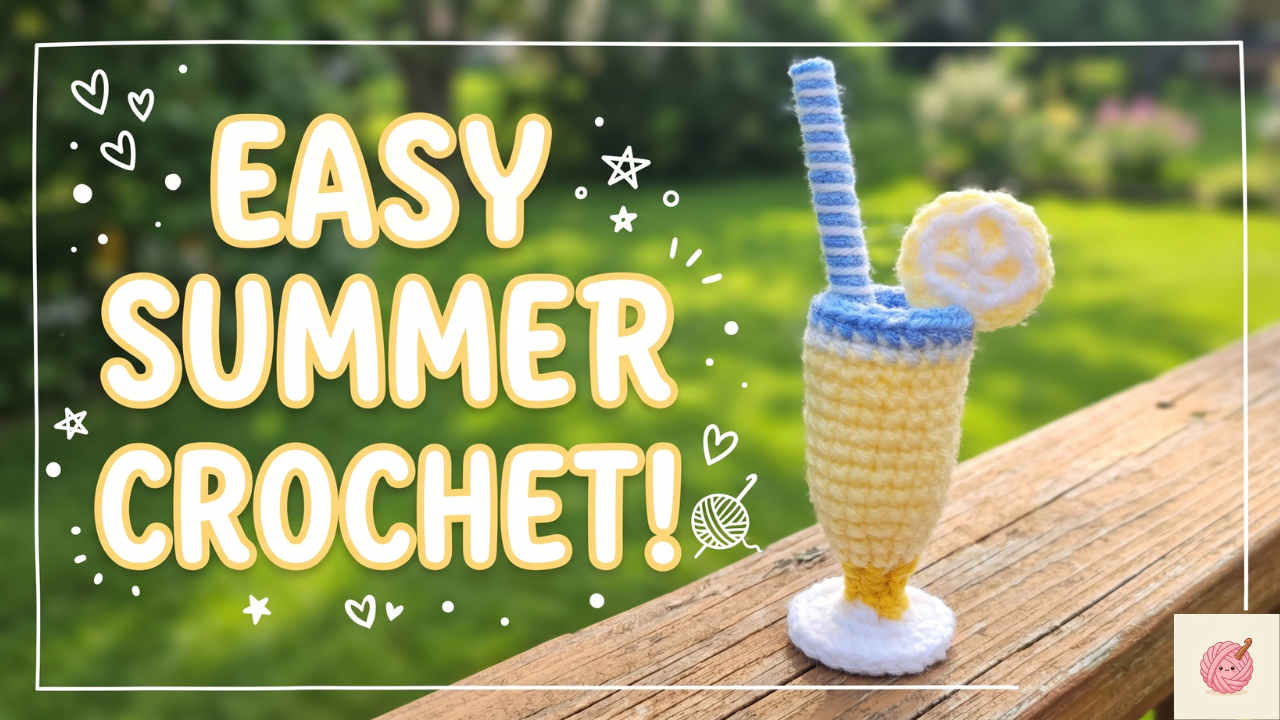
A blue-and-white striped straw and a small lemon slice give this miniature crochet drink its sunny character. The pale-yellow glass sits on a short stem and white foot, while the blue rim defines the opening at the top.
This project is a good opportunity to work with small amounts of several colors. Each detail has a purpose: the yellow suggests lemonade, the white adds contrast, and the blue connects the rim with the straw.
The challenge is keeping those pieces in proportion. A large garnish can overwhelm the glass, while an off-center stem can change how the whole miniature sits.
Use this guide for planning and finishing alongside the Crochetnotes video near the end. The demonstration provides the stitches and construction sequence.
Prepare Your Supplies
- Yellow, white, and blue yarn.
- A crochet hook suited to your yarn.
- A yarn needle and scissors.
- A stitch marker, if helpful.
- Any additional filling or support materials shown in the demonstration.
The public video description does not specify an exact yarn weight or hook size. Check the opening demonstration before choosing your supplies.
Use similar yarn thicknesses for the glass and drink surface so the pieces fit together comfortably. Smooth yarn with visible stitches is helpful when locating the joining points.
Plan the Colors Before Starting
The pictured version uses pale yellow for the main glass, white accents, a blue rim, and a matching striped straw. A yellow-and-white lemon slice sits at the side.
Choose your rim and straw colors together. Repeating one accent color helps the miniature feel coordinated without requiring extra decoration.
If you substitute a different yarn, make the main glass first and check its scale before committing to the smaller pieces.
Crochet the Glass and Drink Surface
Follow the video for the glass section, then make the separate surface that closes the top of the drink.
Before joining, place the two pieces together. Check whether the surface fits the opening without needing to be stretched or folded.
A mismatched edge can come from a stitch-count difference or changing tension between pieces. Check those first rather than squeezing a larger surface into a smaller opening.
Inspect the side view as well as the top. The surface should sit in the intended position without making the upper glass flare unevenly.
Join the Blue Rim Evenly
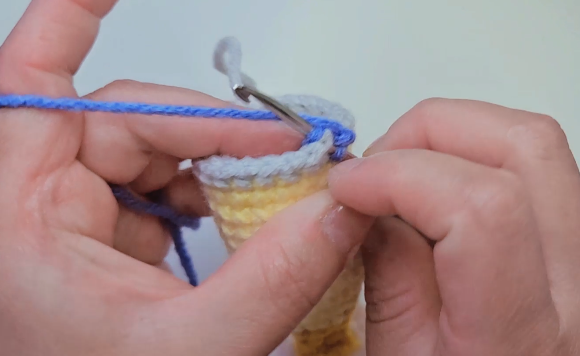
The blue rim is a small detail, but it strongly affects the outline. The step photograph shows the joining work at the upper edge.
Follow the demonstrated insertion points through the relevant layers. Keep the joining tension consistent around the opening.
Pause occasionally to check that one side is not drawing in more tightly than the other. If the rim begins to ripple or pucker, inspect the stitch placement before continuing.
Hide the finishing ends where they will not show across the drink surface. This area remains visible around the straw and garnish.
Align the Stem and Foot
The narrow stem connects the glass to its wider white foot. Their alignment matters more than making either piece exceptionally stiff.
Follow the video for construction and attachment. Before securing the final connection, place the miniature on a level surface and look at it from several directions.
Check whether the stem sits beneath the center of the glass and whether the foot rests evenly. A connection that looks centered from the front may still lean when viewed from the side.
Avoid tightening one side of the attachment more than the other. Even seam tension helps preserve the intended shape.
If your version does not stand independently, use it as a supported decorative piece rather than forcing the stem or adding an unplanned rigid insert.
Position the Lemon Slice
The lemon slice adds a recognizable summer detail near the rim. Make it following the tutorial, then test its position before attaching.
Keep enough of the yellow-and-white face visible that it reads as a slice rather than a plain circular decoration. Turning it slightly toward the front can help.
Check its relationship with the straw. The two details should have room to show without covering each other.
Secure the garnish to the crochet structure with the method demonstrated. Avoid pulling its attachment so tightly that it distorts the rim.
Finish the Striped Straw
The pictured straw repeats the blue and white used around the top of the glass. Its narrow stripes add detail without introducing another color.
Follow the video for its construction and placement. Test the exposed length before completing the attachment; a very tall straw can make the small glass look unbalanced.
Check that it remains secure when the miniature is handled gently. It should not depend on a loose surface loop or pull the drink surface out of position.
Watch the Complete Video Tutorial
The video demonstrates the glass, separate drink surface, stem, lemon slice, straw, and assembly.
Useful chapter points:
- 0:31: Glass base.
- 2:04: Drink surface.
- 5:22: Stem.
- 10:20: Lemon slice and straw.
- 12:00: Assembly.
- 12:11: Finished presentation.
Pause before joining the rim and securing the small details. These are useful moments to compare the fit and adjust the arrangement.
Try Another Miniature Drink
Keep the same construction and change the palette to suggest another drink.
A pink main section with a cream rim can suggest strawberry soda. Brown with a pale accent gives a cola-inspired appearance. Mint and white create a softer decorative version.
Treat these as color variations rather than new patterns. Make additional garnishes only if you have suitable instructions for them, and keep their size in proportion to the glass.
For a small collection, use the same yarn range and hook so the drinks remain similar in scale.
Display and Care
Set the finished glass on a small tray or alongside other crochet food miniatures. Choose a display position where the straw and lemon slice will not be pressed against surrounding objects.
Lift the piece by the glass body rather than the garnish or straw. Check their attachments occasionally if it is handled often.
Follow the care instructions for all the materials used. Gently reshape the glass after cleaning and let it dry completely before returning it to its display.
Project and video tutorial by Crochetnotes.
Watch every stitch up close
Pair these written notes with the complete video tutorial.
Made with yarn, shared with love. 🧶💗