
Crochet Tuanzi Cactus Amigurumi: A Smiling Little Desk Friend
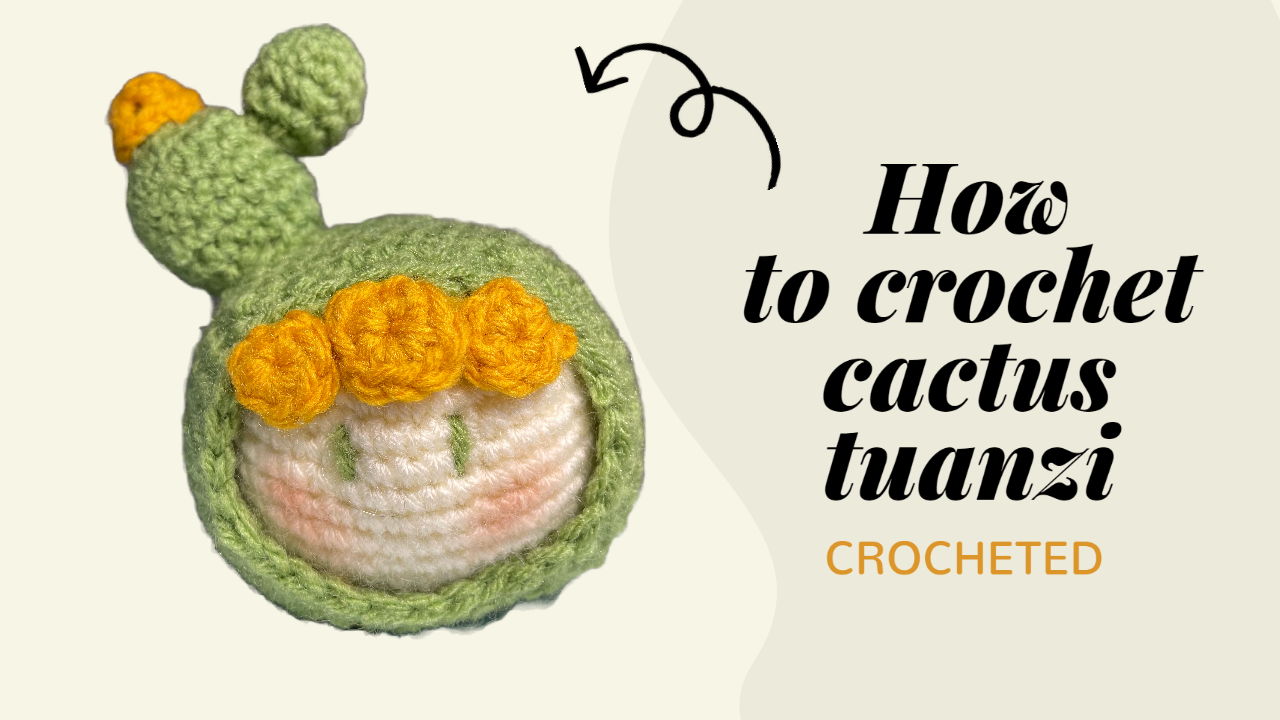
This little Tuanzi combines a rounded cream face with a soft green cactus hood, two small cactus pads, and a yellow flower. Three yellow circles form a playful fringe above the face, while embroidered eyes and rosy cheeks give the finished character its gentle expression.
The project is assembled from several small pieces. Most of the crochet uses single crochet, increases, and decreases; the character comes together through the fit of the hood and the placement of its decorations.
Below are the head instructions, cactus-pad patterns, flower notes, and an assembly guide. The small-pad instructions include the correction posted by the creator beneath the video. One inconsistency in the hood captions is also identified so it is not mistaken for a verified stitch sequence.
Materials
The existing tutorial materials list includes:
- Cream, green, and yellow acrylic yarn.
- A 2.0 mm crochet hook.
- Polyester stuffing.
- A stitch marker.
- A yarn needle and scissors.
- Pink powder blush and a small brush for the cheeks.
The listed yarn is Big Twist acrylic. If you substitute yarn, choose compatible thicknesses for all three colors and a hook that produces a close fabric.
The cream head and green hood need to fit together, so use consistent tension for both. A tightly crocheted hood may be difficult to fit over a loosely crocheted or heavily stuffed head.
No finished measurement or gauge is specified here. Yarn thickness, hook size, and stuffing will affect the finished size.
Abbreviations
US crochet terminology is used.
Abbreviation Meaning
ch Chain
sc Single crochet
dc Double crochet
inc Work 2 single crochets in one stitch
dec Single crochet decrease
sl st Slip stitch
The tutorial demonstrates joined rounds. Follow the starting chain and slip-stitch joins shown in the video, and mark the first actual stitch of each round.
Instructions in parentheses are repeated the stated number of times. Starting chains and joining slip stitches are separate from the listed single-crochet counts.
1. Crochet the Cream Head
The cream head is a stuffed rounded shape that sits inside the green hood.
Round Instructions Stitches
R1 6 sc using the starting method demonstrated 6
R2 Inc in each stitch 12
R3 (sc, inc) × 6 18
R4 (2 sc, inc) × 6 24
R5 (3 sc, inc) × 6 30
R6 (4 sc, inc) × 6 36
R7 (5 sc, inc) × 6 42
R8–R14 42 sc in each round 42
R15 (5 sc, dec) × 6 36
R16 (2 sc, dec, 2 sc) × 6 30
R17 (3 sc, dec) × 6 24
R18 (2 sc, dec) × 6 18
R19 (sc, dec) × 6 12
R20 6 dec 6
Add stuffing before the opening becomes too small. Work with small amounts, distributing them around the inside rather than pushing one large piece into the center.
Close the remaining opening and secure the yarn end.
Shape the face before fitting the hood
The head should feel evenly filled without becoming hard. Look at it from several directions and gently redistribute any lumps.
Choose the smoothest area for the face. This gives you a clear reference when positioning the hood, fringe, and embroidered eyes.
2. Make and Fit the Green Hood
The hood wraps around the cream head and leaves a circular face opening.
At approximately 20:07, the video states that hood R1–R16 are the same as Part 1. It then displays:
Video label Instructions shown
R17 Ch 1, (5 sc, dec) × 6, sl st
R18 Ch 1, (2 sc, dec, 2 sc) × 6, sl st
Caption clarification: The “R1–R16” reference does not align with these later decrease formulas: head R16 ends with 30 stitches, while the displayed hood R17 requires 42 stitches. This transition needs checking against the demonstration; it has not been silently rewritten as a corrected pattern.
Use the hood section beginning at 19:38 to follow its construction and fitting. Insert the cream head before completing the opening, as shown.
When checking the fit:
- Center the chosen face area within the opening.
- Smooth the green fabric over the back of the head.
- Check that the edge frames the face without pulling it into an oval.
- Keep the round joins toward a less visible area where practical.
The hood should sit comfortably around the head. Avoid stretching a tight opening into place, as this can distort both layers.
Finish the edge as demonstrated and hide the remaining tail inside the green fabric.
3. Crochet the Larger Cactus Pad
Use green yarn. Begin each joined round and finish with a slip stitch as demonstrated.
Round Instructions Stitches
R1 6 sc 6
R2 6 inc 12
R3 (sc, inc) × 6 18
R4–R6 18 sc in each round 18
R7 (7 sc, dec) × 2 16
R8 16 sc 16
R9 (2 sc, dec) × 4 12
R10 (sc, dec) × 4 8
Add a small amount of stuffing, close the opening, and leave a tail for attachment.
Gently shape the piece into a cactus pad rather than packing it into a firm ball. Its narrower end will become the attachment point.
4. Crochet the Smaller Cactus Pad
Use green yarn.
Round Instructions Stitches
R1 6 sc 6
R2 6 inc 12
R3–R4 12 sc in each round 12
R5 (sc, dec) × 4 8
R6 8 sc 8
Stuff lightly, finish the opening, and leave a sewing tail.
Creator’s correction: The pinned comment beneath the video corrects the instructions around 35:34 to “R3–R4: 12 sc; R5: (sc, dec) × 4.” The table above follows that correction rather than the erroneous increase caption.
The smaller pad should remain visibly smaller than the main pad. Compare them before attaching either piece.
5. Make the Yellow Flower
The flower uses a five-stitch center followed by five petals.
R1: Work 5 sc into the starting ring and join with a sl st.
R2: The displayed petal sequence is (ch 2, 2 dc, ch 2) × 5, followed by a joining slip stitch.
Follow the close-up for anchoring each petal around the center. Leave a tail for sewing.
Spread the petals gently, then sew the flower to the larger green pad. Attach it securely at the center while allowing the petals to retain their shape.
It is easier to position the flower while the pad is still separate from the hood.
6. Make the Yellow Fringe
Make three small yellow circles:
- Two circles with 8 sc each.
- One circle with 10 sc.
Join and finish each circle, leaving sewing tails.
These pieces form the fringe across the forehead. Arrange them together along the upper edge of the cream face, with the larger circle helping establish the center.
Place all three before sewing. Their spacing changes the expression, so check that they leave enough room for the eyes below.
Sew them with small stitches and relaxed tension. Pulling the attachment yarn too tightly can make the circles cup or dent the cream head.
7. Assemble the Cactus
Begin with the cream head fitted inside its green hood.
Position the larger cactus pad near the top, then place the smaller pad beside it as shown in the finished example. Hold the pieces temporarily with removable markers or pins.
Check the arrangement from the front and side:
- The face remains centered.
- The larger pad and flower are clearly visible.
- The smaller pad complements the larger one.
- The attachment points sit firmly against the hood.
Sew around the base of each pad, checking the angle as you work. A broad, secure connection supports the pieces better than a few tightly pulled stitches at one point.
Weave the tails through the green fabric and hide them inside.
8. Embroider the Face
Position the eyes after the hood and fringe are in place. Their relationship to the yellow circles matters more than their distance from the original starting round.
Use the demonstration as a placement guide and embroider both eyes with similar size and tension. Small temporary thread marks can help you compare their positions before committing.
Avoid pulling the embroidery tightly through the stuffed head. The surface should remain rounded around the eyes.
Add a little pink blush to the cheeks, building the color gradually with a small brush. Keep the cheeks balanced without covering the cream face too heavily.
Troubleshooting the Finished Shape
The face looks off-center
Adjust the head inside the hood before sewing additional pieces. Moving the fringe alone may make the decoration look centered while leaving the underlying opening uneven.
The cactus pad leans more than intended
Check its attachment base and stuffing. Reposition the pad and spread the sewing stitches around its base rather than tightening one side excessively.
The yellow circles curl upward
Check whether the starting ring or sewing stitches are too tight. Arrange the circles flat and ease the attachment tension before adding more stitches.
Stuffing shows between stitches
Reduce the amount of filling and check the fabric tension. More stuffing will make visible gaps wider rather than improve the shape.
Full Video Tutorial
Use the video for the hood transition, petal anchoring, and the placement of the finished pieces.
Useful sections:
- Beginning–19:38 — Cream head.
- 19:38 — Green hood.
- 25:26 — Larger cactus pad.
- Around 35:34 — Small-pad section covered by the pinned correction.
- Around 38:00 — Yellow flower.
- Around 40:00 onward — Decoration and assembly.
A Little Cactus with Its Own Expression
Before displaying the finished Tuanzi, check the seams, hide any remaining tails, and give the hood and pads a final gentle adjustment.
The appeal of this project comes from a few clear shapes: a soft cream face, a green frame, two cactus pads, and bright yellow details. Taking time with their placement gives the finished character its cheerful expression.
Set it on a desk or craft shelf, or make another with a different flower color. Keep the same rounded construction and adjust the decoration to give each little cactus its own personality.
Watch every stitch up close
Pair these written notes with the complete video tutorial.
Made with yarn, shared with love. 🧶💗