

# Crochet Eye Granny Square: A Bold Motif for Bags and Blankets
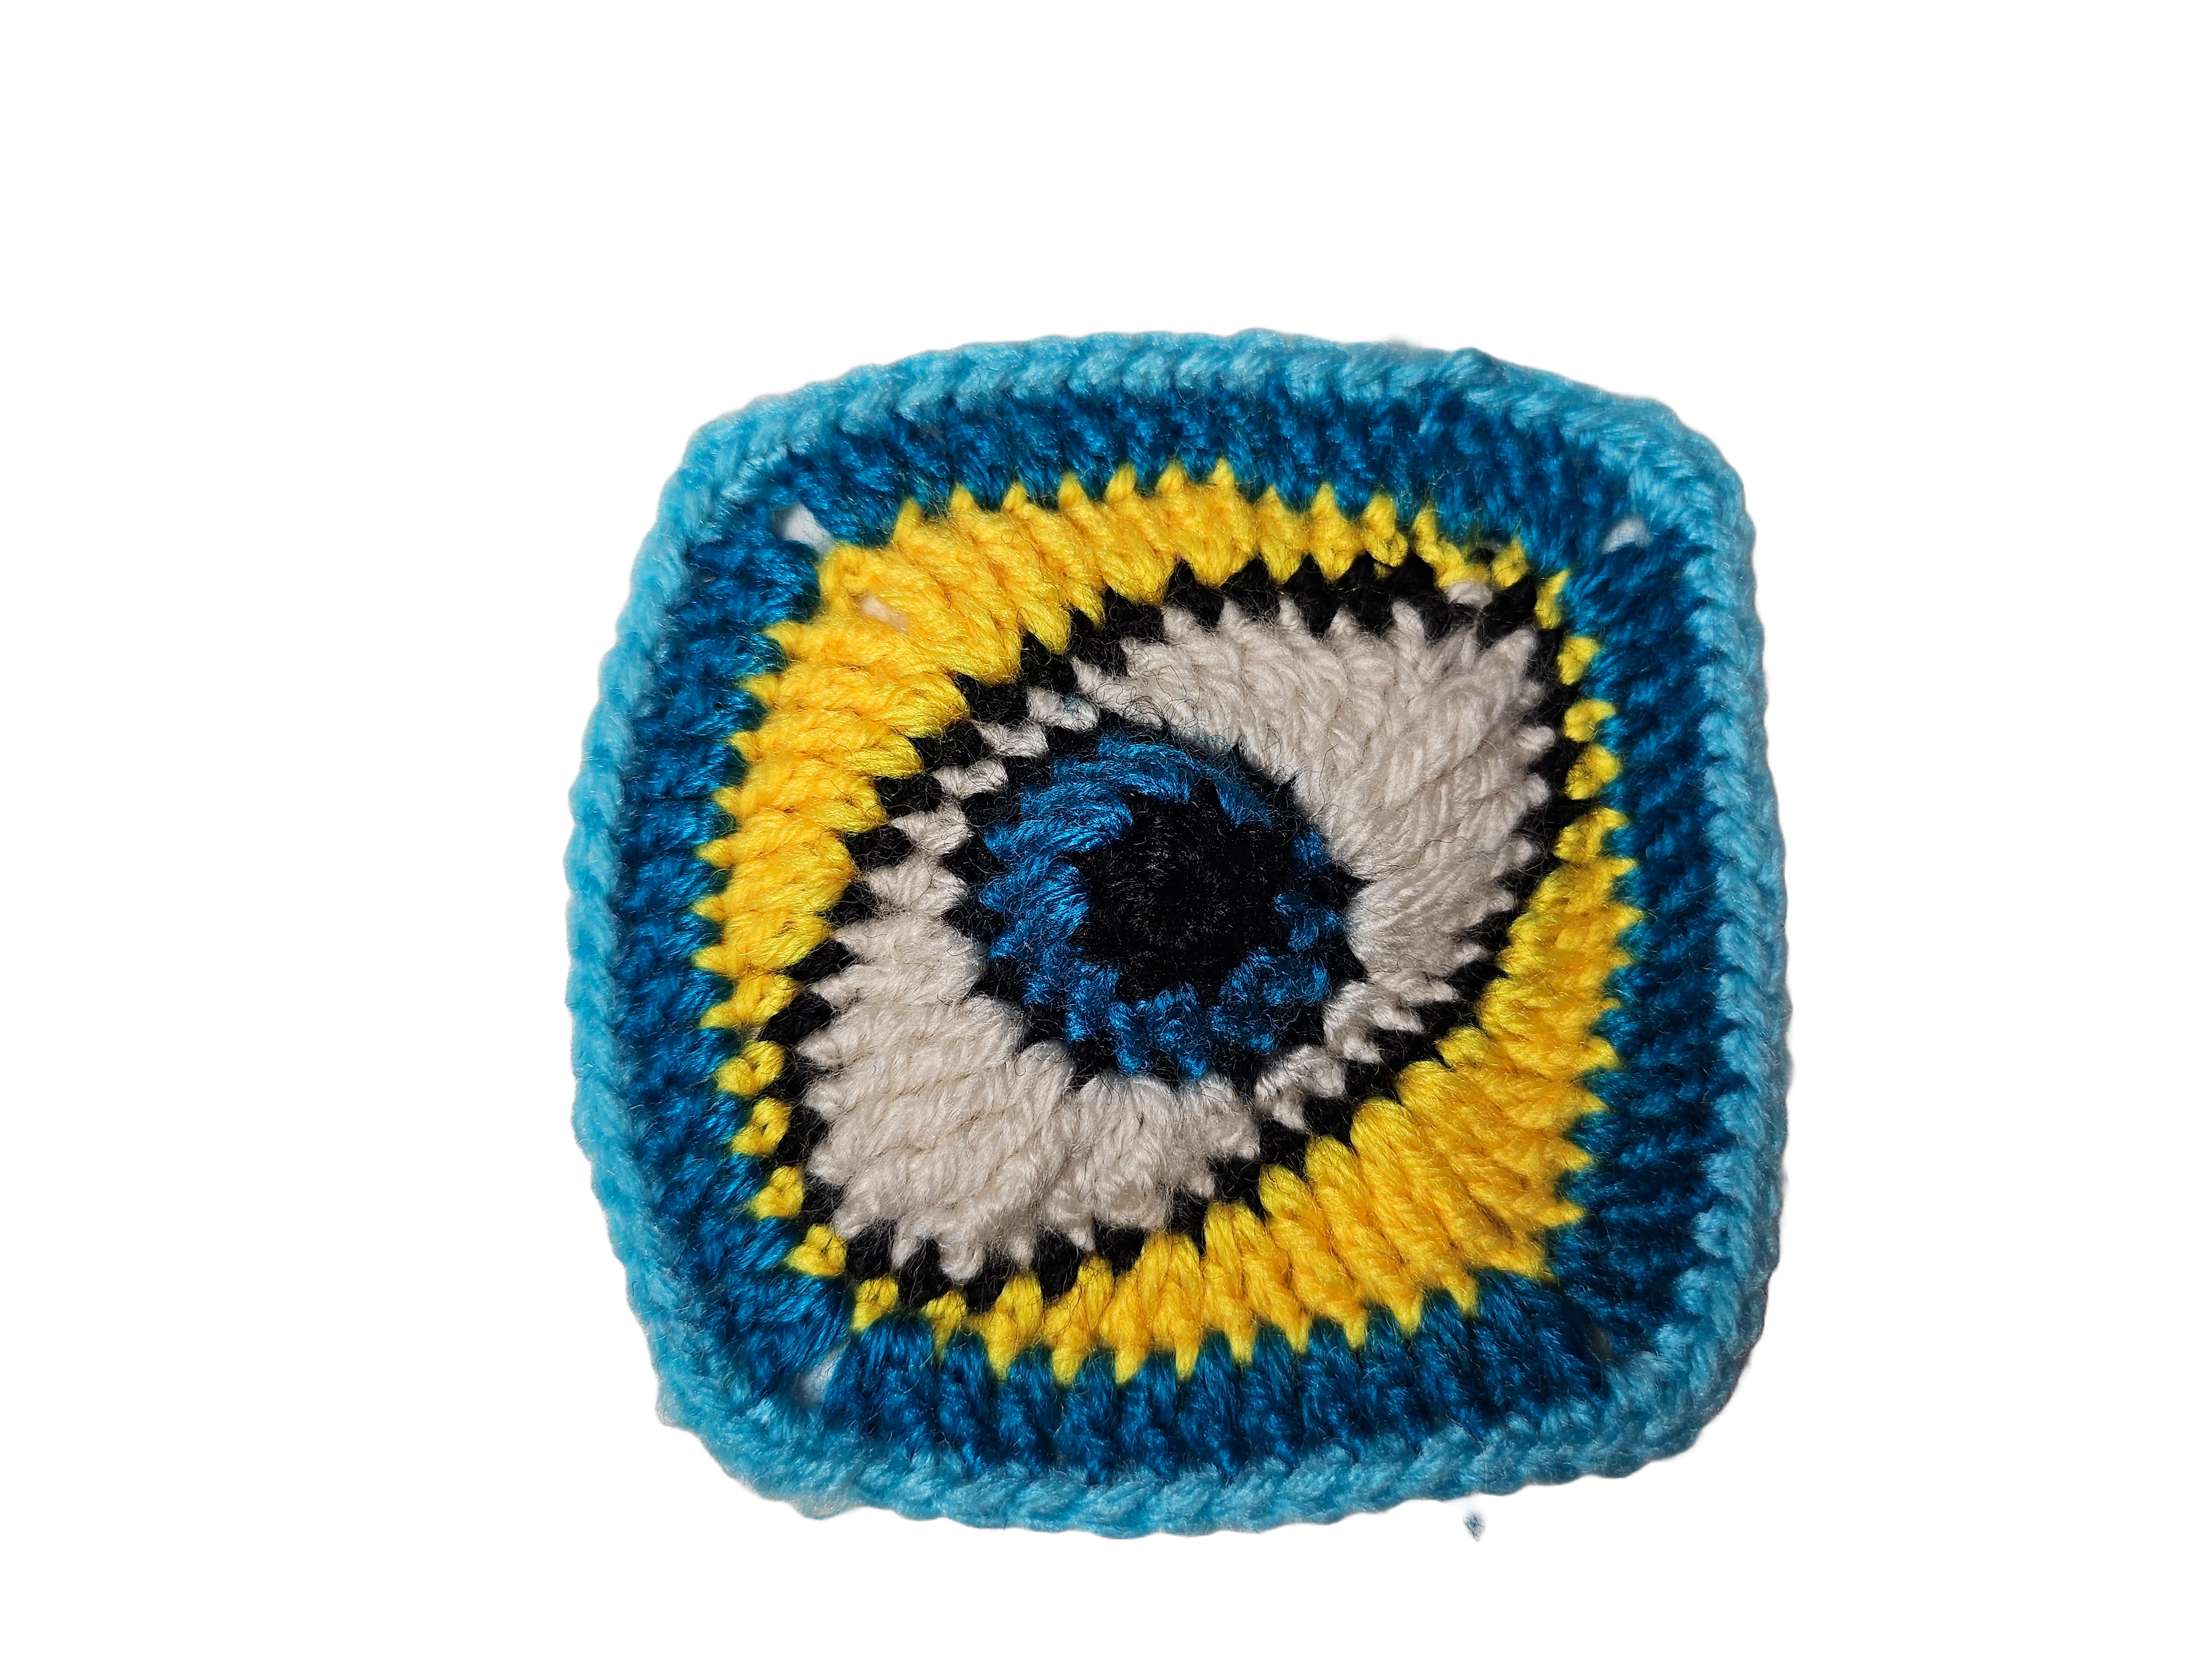
An eye motif draws attention because its parts have such clear roles: a dark center, a contrasting iris, a light surround, and two pointed ends. In this square, those familiar shapes sit diagonally inside a bright background, making the motif feel active even when it is used on its own.
The cream section is the key transition. It changes the circular pupil and iris into an elongated eye before the surrounding crochet builds a square. That makes this a different construction from a plain circle-in-a-square motif, even though both begin near the center and work outward.
This guide follows the Crochetnotes video and includes the stitch diagram supplied with the original article. Use the diagram for the complete stitch placement and the demonstration for the starting chains, joins, and color transitions. The written explanations below help you understand what each section is doing, without replacing unclear chart symbols with guessed stitch counts.
Materials and color roles
Gather black, blue, cream, yellow, and your chosen outer-border yarn, together with a suitable hook, scissors, a yarn needle, and removable markers.
The sample uses a black pupil and outline, blue iris, cream eye surround, yellow background, and blue-to-turquoise framing. You can change the palette while keeping the same contrast relationships.
| Part | What the color needs to do | | --- | --- | | Pupil | Remain visibly darker than the iris | | Iris | Show as a separate ring around the pupil | | Eye surround | Contrast with both the iris and the background | | Outline | Define the elongated eye without overwhelming it | | Background | Leave the eye easy to recognize | | Outer edge | Frame the motif and provide a useful joining boundary |
Choose yarns of similar thickness. A much heavier cream yarn changes the eye’s proportions, while a thin background yarn may not fill around it in the same way as the sample.
No finished size or exact yarn quantity is assigned here. Make one complete motif, finish it, and measure it before deciding how many you need for a larger project.
Keep the stitch diagram beside you
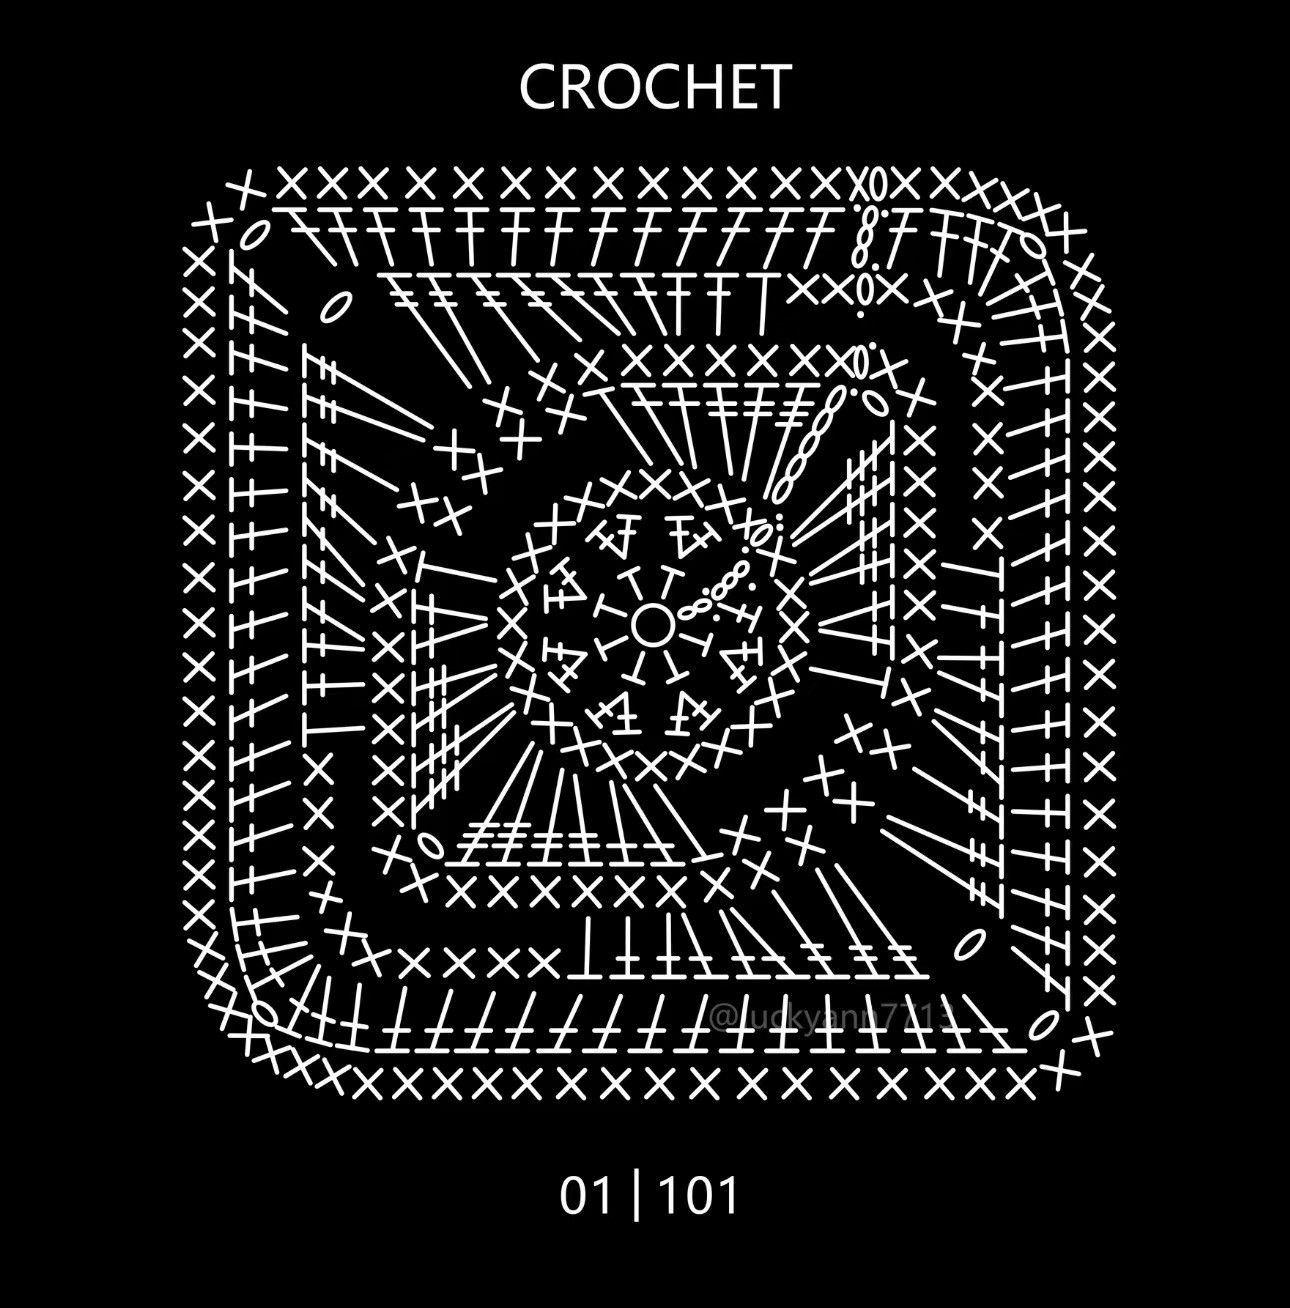
Read from the center outward. Look for the changes in post height, groups sharing a base, chain spaces at the pointed ends, and the later four corners.
A chain oval is different from a stitch post. Several posts meeting at one base belong in the same stitch or space. Longer posts with more crossbars represent taller stitches; count the crossbars rather than treating all tall symbols as double crochet.
Mark your current position on a separate note or a printed copy. The elongated eye and square frame have different reference points, so it is easy to resume at the wrong side after putting the project down.
1. Start the dark pupil
The opening subtitle specifies chain 2, then 7 double crochet into the ring. Preserve that starting instruction and its joining convention when following the demonstration.
Keep the starting chain separate in your notes from the seven explicitly worked double crochet stitches. Do not casually turn the line into “8 dc into the ring” without checking how the video uses the starting chain and join.
Place a marker at the joining reference shown. Close the magic ring once the center stitches have been arranged, and retain enough tail to secure it later.
2. Add the blue iris
Change to blue and follow the iris round in the chart. The demonstration begins this section with a chain-3 rise and works double crochet around the dark center.
Work the grouped posts into their indicated bases. The iris must expand around the pupil; working every symbol as a separate base stitch or adding an extra stitch at the join will change that relationship.
Before changing back to black, lay the piece down. The blue should remain visible around the dark center without being gathered into a cup. Compare the join area with the rest of the ring; a small extra group there can make one side noticeably fuller.
3. Work the next black section
The video returns to black after the blue round. Follow the charted black section around the iris rather than assuming that every dark line is embroidered on at the end.
This dark boundary helps separate the colored iris from the cream eye surround. Keep its tension even and leave the fabric relaxed enough for the next section to spread outward.
Secure color transitions without making a hard knot at the center. Keep dark tails on the reverse and away from pale open spaces where they may show through.
4. Shape the cream eye
Join cream at the demonstrated point and work the mixed stitch heights shown in the diagram. The short stitches sit nearer the narrower areas; taller groups provide the width and height needed to form the elongated eye.
A visible subtitle in this section calls for 4 single crochet before the next shaping changes. Treat it as a local part of the sequence, not as an instruction to repeat four single crochet around the entire round.
Pay special attention to the chain spaces at the two ends. These are eye-shaping points, and they are not yet the four corners of the outer square.
When the cream section is complete, compare both ends. They should belong to the same elongated outline even though your viewing angle and the joining point can make them look different while the work is in your hands.
5. Define the outer eye contour
The next black detailing follows the cream outline. Follow its stitch placement in the chart and video; do not replace the demonstrated crochet with an assumed embroidery stitch.
Keep the dark line smooth through the pointed ends. If the cream fabric begins to gather, loosen the relevant stitches and check whether an eye-tip space has been missed.
Look at the piece from a normal viewing distance. The pupil, blue iris, and cream outline should remain distinct, with the black serving as a boundary rather than becoming the largest visible section.
6. Fill the yellow background
The yellow section converts the eye into a shape that can be framed as a square. This requires graduated stitch heights around an outline that is not circular.
The demonstration includes half double crochet and a treble crochet increase during this background stage. Those changes help bridge different depths around the eye; a uniform round of one stitch would not create the same outer boundary.
Use the diagram to locate each increase and chain space. Several tall posts sharing a base must be grouped at that base, not spread one per neighboring stitch.
Mark the four square corners as they become established. Keep them distinct from the two eye points. The eye’s diagonal orientation depends on the relationship between these two sets of reference points.
7. Finish the outer frame
Follow the outer blue framing and final edging in the source. Check the complete side structure before joining each round, and avoid working an extra ordinary stitch into the previous slip-stitch join.
Keep the corners open enough to turn without being loose. A very tight corner pulls the adjacent sides inward; an extra group can create a ruffle that continues into the next round.
Weave in the ends through matching colors where practical. Inspect the reverse before trimming, especially where a dark tail passes near cream stitches or chain spaces.
Finish one motif before making a set
Block the square with a method appropriate for your yarn. Ease the four corners into position without stretching the diagonal eye until its pupil becomes oval.
Measure the completed square and note the hook and yarns used. If you will join it to plain squares, compare both their dimensions and their available edge stitches. A short test seam is more informative than holding two loose motifs beside one another.
For a pouch or bag, consider how the open spaces will behave in use. A lining can support the crochet and contain small belongings, but fit it to the finished fabric rather than forcing the crochet around a predetermined lining size.
Choose the eye direction before joining
Lay the motifs on a table and rotate them. All eyes facing the same direction create a clear repeated pattern; alternating directions creates a more varied panel.
For a bag, fold the layout into its intended three-dimensional shape before sewing. Check the front, back, base, and sides. A diagonal eye that looks balanced on a flat rectangle may finish sideways after the panel is folded.
A single eye square also works as a statement pocket or the center of a cushion panel. Surrounding it with simpler fabric gives the motif room to remain readable.
Troubleshooting
The iris is lost against the pupil. Check the color contrast and whether the blue groups were worked into their intended bases.
The cream looks like another circle. Recheck the mixed stitch heights and the two eye-end chain spaces. Replacing the shaping with uniform stitches removes the elongated outline.
The yellow will not form four sides. Locate the square corners in the diagram separately from the eye tips.
The black outline puckers. Check its tension and the placement through the pointed ends before trying to stretch the completed motif.
Watch the eye granny square tutorial
Use the demonstration for the starting-chain convention, grouped stitches around the iris, cream eye points, and the yellow-to-blue transition into the finished square.
Make the motif readable first
The most useful finishing check is also the simplest: step back and look at the whole square. Clear contrast, a distinct elongated eye, and an even frame make the design work. Once those parts are settled, one carefully finished motif can guide every additional square in your project.
Watch every stitch up close
Pair these written notes with the complete video tutorial.
Made with yarn, shared with love. 🧶💗