
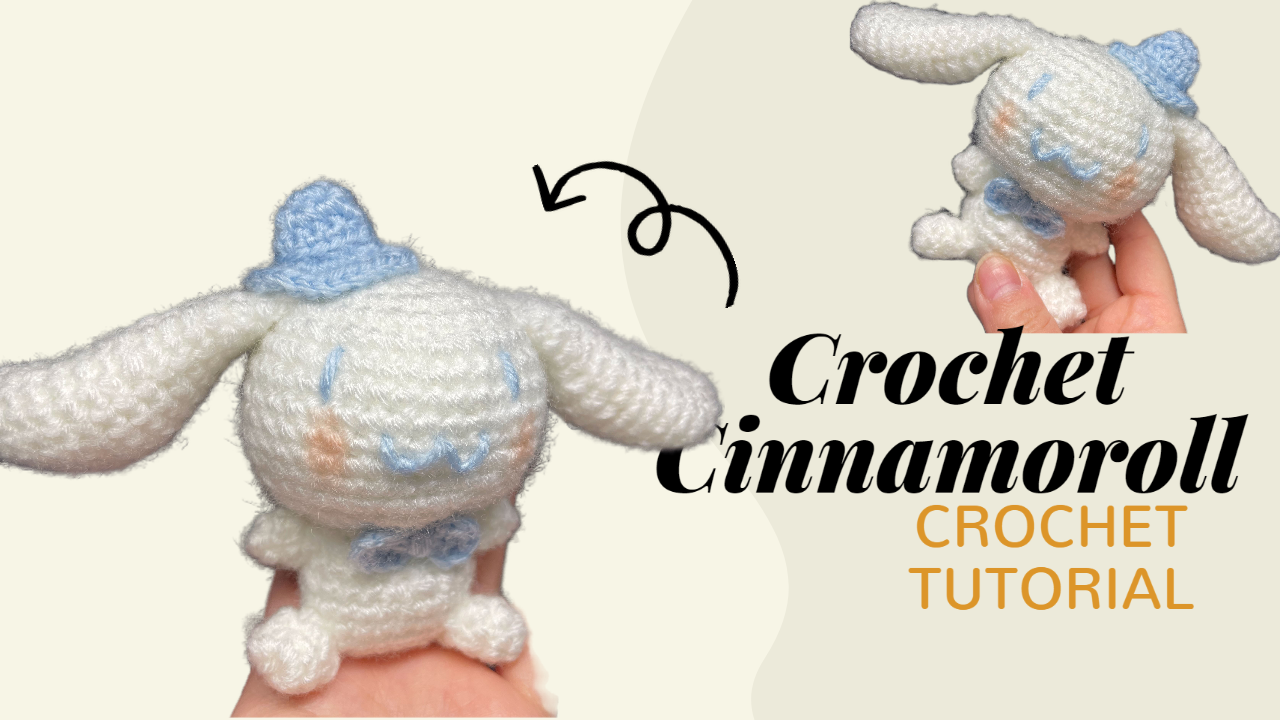
Crochet a Floppy-Eared Puppy with a Tiny Blue Hat
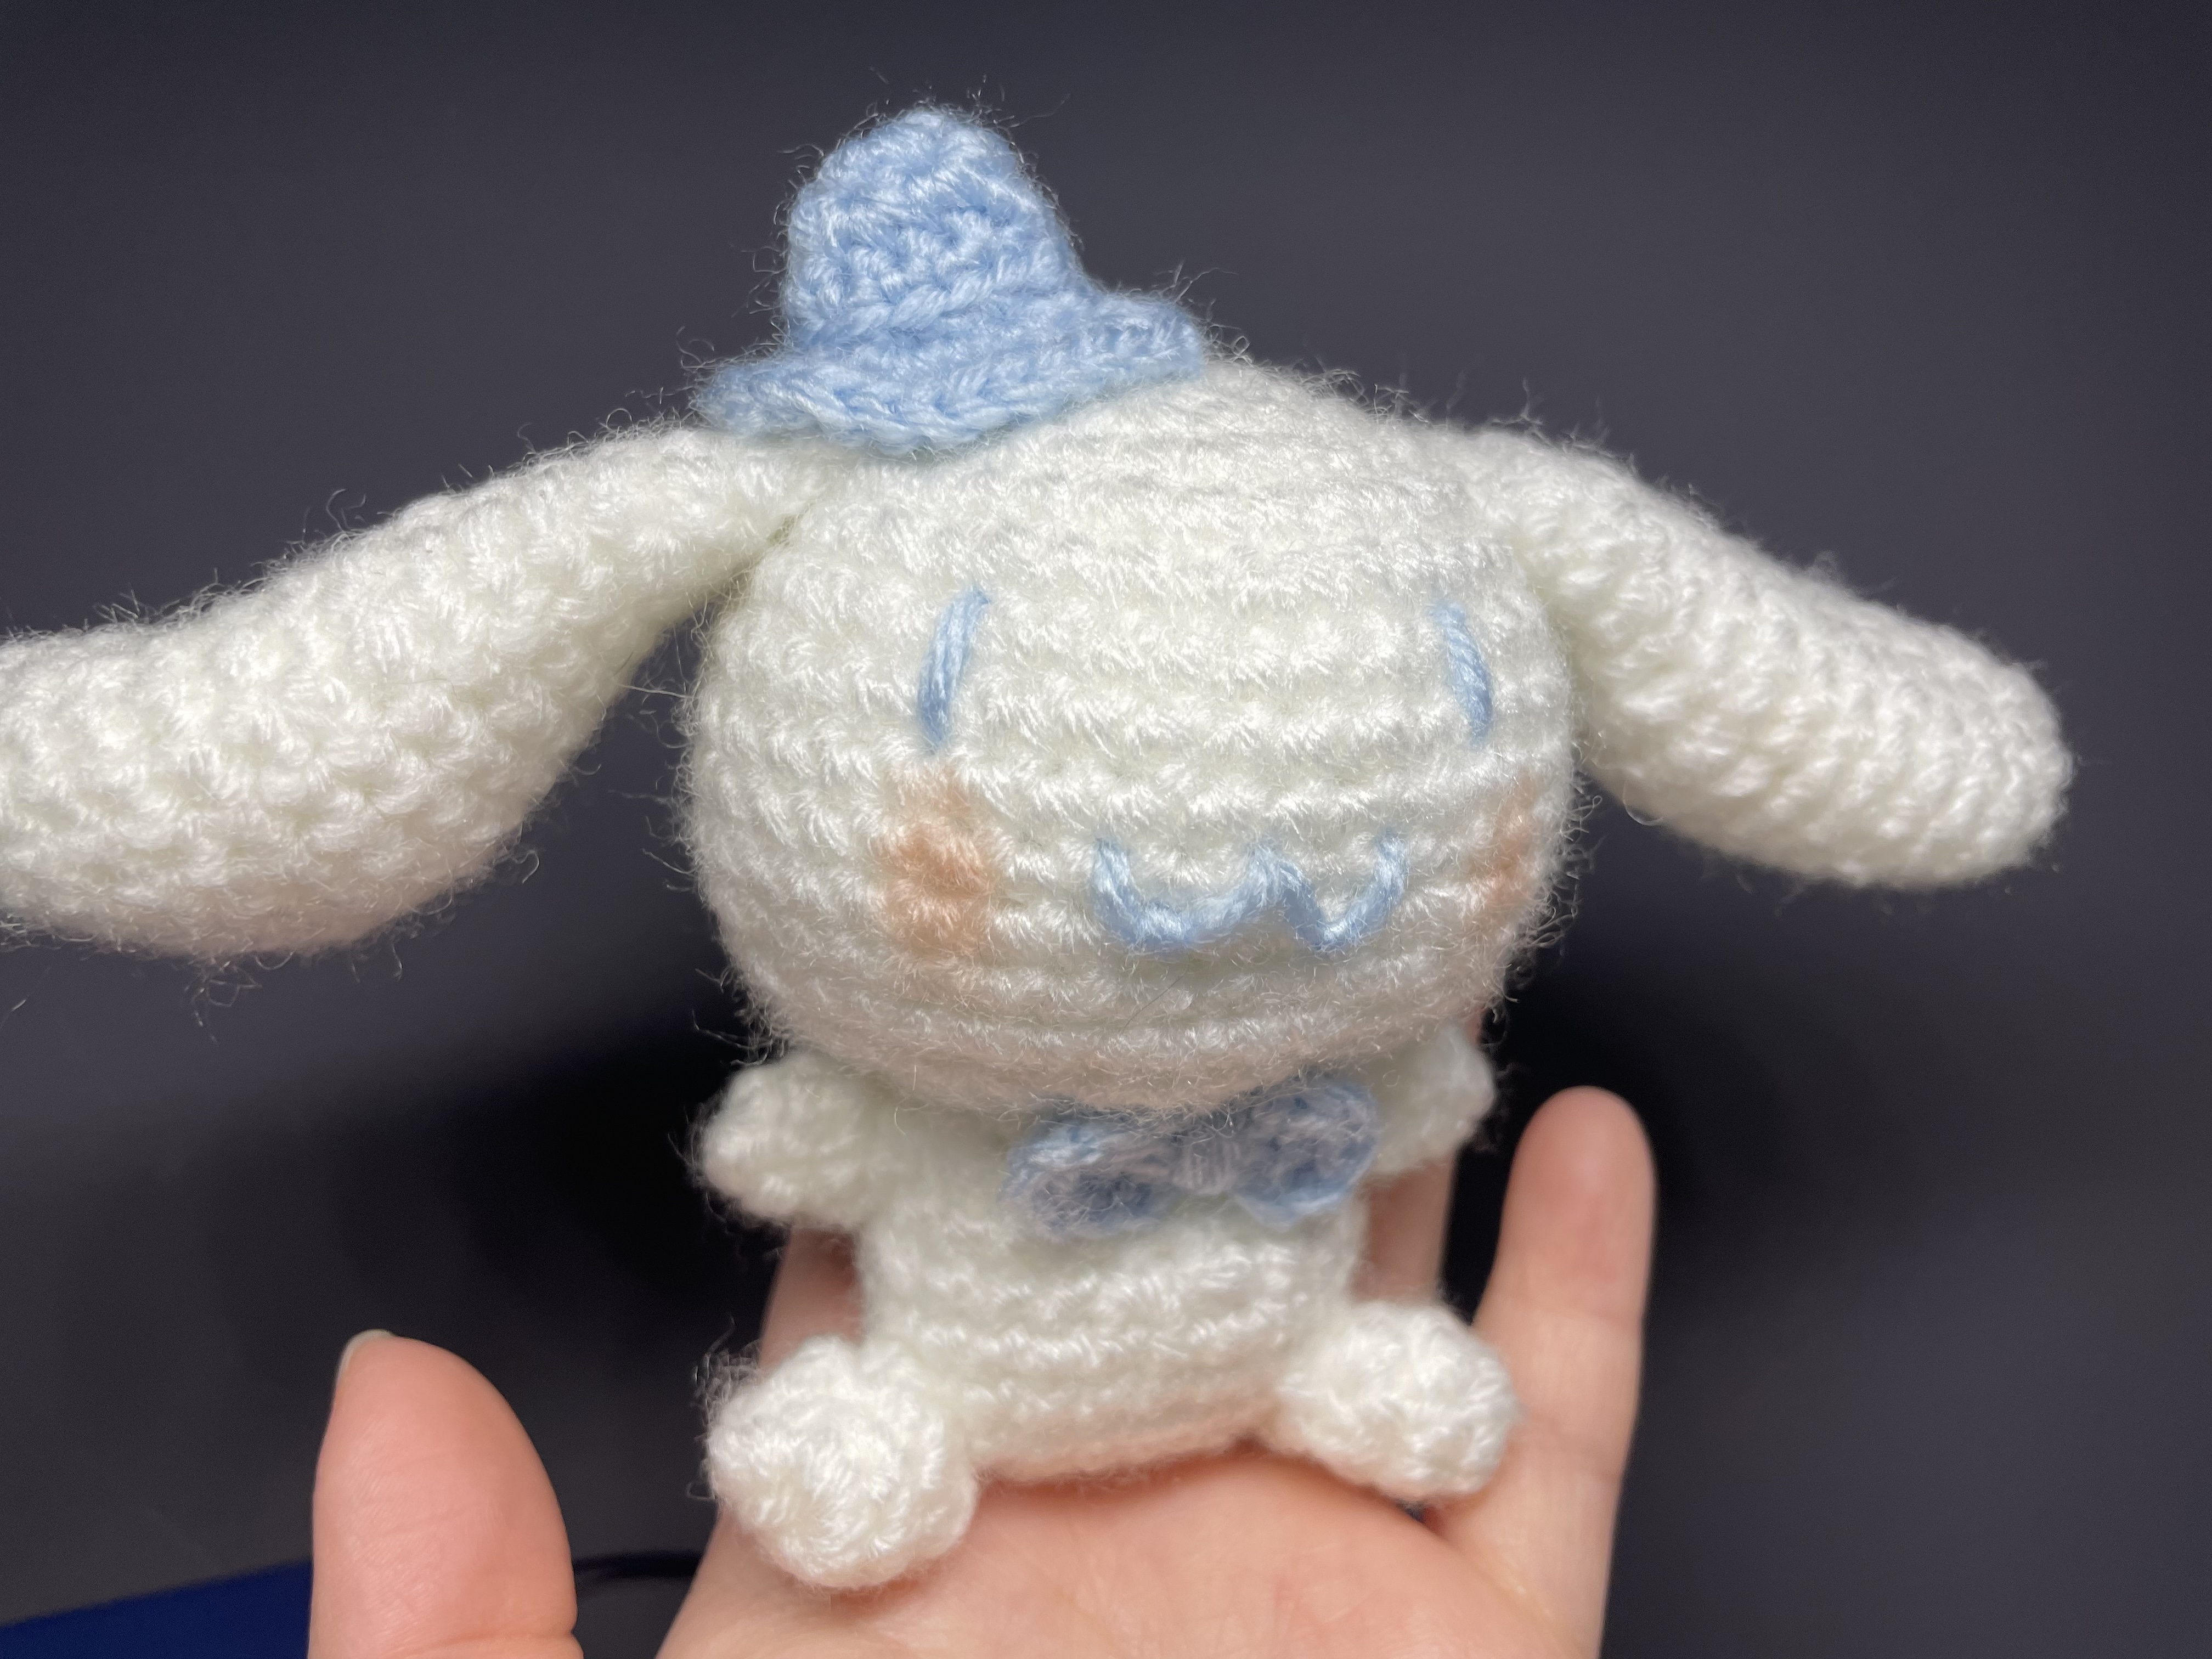
Long white ears, a rounded head, and a tiny blue hat give this crochet puppy its gentle expression. A matching bow sits beneath the face, bringing the blue accessories and embroidered features together.
The proportions are part of the appeal: the head is larger than the body, the arms and feet stay small, and the ears extend outward before falling to either side. The individual pieces use mostly single crochet, increases, and decreases. Careful counting establishes the shapes; stuffing and placement bring them together.
This written companion organizes the video’s instructions into separate tables so you can keep track of each piece. Read the source note in the tail section before treating that part as a standalone pattern.
Materials and Preparation
Prepare:
- White yarn for the puppy.
- Pale blue yarn for the hat, bow, and facial embroidery.
- Peach yarn if you want embroidered cheek accents.
- A crochet hook that produces firm fabric with your chosen yarn.
- Toy stuffing.
- Stitch markers, a yarn needle, and scissors.
- Removable pins or contrasting yarn for positioning the pieces.
No verified yarn weight, hook size, finished measurement, or yarn quantity is specified here.
Use similar yarn thicknesses for the main pieces. Check the accessories against the finished head before attaching them, particularly if your blue yarn differs from the white.
Abbreviations and Round Notes
These instructions use US crochet terminology.
Abbreviation Meaning
ch Chain
sc Single crochet
dc Double crochet
inc Work 2 sc into one stitch
dec Single crochet decrease over 2 stitches
sl st Slip stitch
FLO Front loop only
BLO Back loop only
× Repeat the preceding sequence
For example, (3 sc, dec) × 8 means three single crochets followed by a decrease, repeated eight times.
The video generally uses joined rounds: ch 1 at the beginning and sl st at the end. The tables below list the working stitches and their totals; do not add the beginning chain or joining slip stitch to those totals.
Begin the circular pieces with the magic-ring setup demonstrated in the video. Leave sewing tails where the pieces will be attached.
1. Crochet the Head
Use white yarn.
Round Working stitches Total
1 6 sc into the starting ring 6
2 Inc × 6 12
3 (Sc, inc) × 6 18
4 (Sc, inc, sc) × 6 24
5 (3 sc, inc) × 6 30
6 (2 sc, inc, 2 sc) × 6 36
7 (5 sc, inc) × 6 42
8–13 Sc in every stitch for 6 rounds 42 each
14 (19 sc, dec) × 2 40
15 (3 sc, dec) × 8 32
16 (Sc, dec, sc) × 8 24
17 (Sc, dec) × 8 16
Keep the final opening available for stuffing and joining to the body.
Shape the Head Evenly
Add small portions of stuffing, guiding them into the sides and rounded upper section. Turn the head as you work and compare the front, back, and profile.
The face needs an even surface beneath the embroidery. If a hard lump sits behind one eye position, redistribute the stuffing before sewing the features.
Support the shape without stretching the stitch openings. More stuffing will not correct a missed decrease or an uneven round.
2. Crochet the Body
Use white yarn.
Round Working stitches Total
1 8 sc into the starting ring 8
2 Inc × 8 16
3 (Sc, inc) × 8 24
4–6 Sc in every stitch for 3 rounds 24 each
7 (4 sc, dec) × 4 20
8 Sc in every stitch 20
9 (3 sc, dec) × 4 16
Fasten off with a sewing tail. Stuff the body and leave its 16-stitch opening ready to meet the head’s 16-stitch opening.
Check the filling near the neck. It should support the larger head without creating a hard bulge at the join.
3. Make Two Arms
The arms are small, three-round pieces.
Round Working stitches Total
1 5 sc into the starting ring 5
2 2 sc, inc, 2 sc 6
3 Sc in every stitch 6
Fasten off with a sewing tail and make a second arm.
Compare the pair before attachment. Keep their rounded ends similar rather than stretching one piece to match the other.
4. Make Two Floppy Ears
The ears begin at their wider ends and gradually narrow toward the attachment edge.
Round Working stitches Total
1 6 sc into the starting ring 6
2 Inc × 6 12
3 (Sc, inc) × 6 18
4–6 Sc in every stitch for 3 rounds 18 each
7 (7 sc, dec) × 2 16
8 Sc in every stitch 16
9 (6 sc, dec) × 2 14
10 Sc in every stitch 14
11 (5 sc, dec) × 2 12
12 Sc in every stitch 12
13 5 sc, dec, 5 sc 11
14 Sc in every stitch 11
15 9 sc, dec 10
16 Sc in every stitch 10
17 Flatten the opening and work 5 sc through both layers 5 joining stitches
Leave a sewing tail and make the second ear.
The final five stitches join the two sides of the flattened opening. They are not an ordinary round of five stitches worked around the opening.
Keep the ears flexible so they can drape. Lay them beside each other and compare the length, tapered ends, and direction of the fabric before sewing.
5. Make Two Feet
Use white yarn.
Round Working stitches Total
1 8 sc into the starting ring 8
2 Sc in every stitch 8
3 2 sc, dec × 2, 2 sc 6
Fasten off with a sewing tail. Make a matching second foot.
Temporarily position both feet on the lower body before securing either one. Compare their height and angle from the front and underside.
6. Crochet the Tail
The tail is a separate tapered piece.
Round Working stitches Total
1 6 sc into the starting ring 6
2 See the source note below Transition to 9
3–4 Sc in every stitch 9 each
5 7 sc, dec 8
6–7 Sc in every stitch 8 each
8 6 sc, dec 7
9–12 Sc in every stitch for 4 rounds 7 each
13 5 sc, dec 6
14–15 Sc in every stitch 6 each
Tail Round 2 source note: The displayed formula reads “3 × (5 sc, sc inc)”, which cannot follow a six-stitch starting round. The following captions specify nine stitches. Three evenly spaced increases would mathematically produce that transition, but that is a reconstruction rather than the displayed instruction. Confirm this round before following the tail as a complete written pattern.
Leave a tail for sewing. Position the finished piece at the back of the body and arrange its curve before securing it.
7. Make the Tiny Blue Hat
Use pale blue yarn.
The video repeats the “R1” label on the increase round. The table numbers the six successive rounds in working order.
Round Working stitches Total
1 6 sc into the starting ring 6
2 Inc × 6 12
3 Sc in every stitch, FLO 12
4 Sc in every stitch, BLO 12
5 (Sc, inc) × 6 18
6 (2 sc, inc) × 6 24
Follow the demonstrated ch 1 beginnings and slip-stitch joins.
The front-loop and back-loop rounds are part of the shaping. Keep those insertion instructions distinct rather than working both rounds through the full stitch.
Fasten off with enough yarn to attach the hat. Gently shape the crown and brim, then test its position on the head.
8. Make the Matching Bow
Work both sides into the same magic ring.
Repeat this sequence twice:
Ch 3, 2 dc, ch 3, sl st into the ring.
Draw the ring closed to bring the two sides together. Arrange them evenly, then use the yarn tail to wrap and define the center as demonstrated.
Leave enough yarn to secure the bow beneath the puppy’s head.
Assemble the Puppy
Join the Head and Body
Stuff both pieces before closing the neck join. Their final openings each contain 16 stitches.
Position the head on the body and mark the intended front. Support the head while sewing around the join, keeping the stitches even and checking the angle as you work.
Before securing the last section, inspect the neck from all sides. Add or redistribute a little filling if there is an unsupported hollow.
Position the Ears Together
Temporarily place both ears before permanently attaching either one.
Check their position from the front, above, and in profile. Their bases should sit at a similar height, and the ears should fall naturally without one seam twisting toward the back.
Sew along the flattened attachment edges. Keep the stitches secure without pulling the bases into tight bunches.
Attach the Arms, Feet, and Tail
Position the arms at the sides of the body and the feet near the bottom. Check the arrangement with the bow held in place so the accessories do not crowd the limbs.
Attach the tail at the back. Turn the puppy around while checking the seams; the rear finishing will remain visible when the figure is displayed or handled.
The finished example is supported in the photograph, so the image alone does not establish that the puppy can stand independently.
Embroider the Expression
The pictured puppy has narrow blue eyes, a curved blue mouth, and peach-colored cheeks.
Mark the face with removable yarn before embroidering. Compare the eye height and spacing against the center of the head rather than relying only on the direction of the crochet rounds.
Lay the embroidery against the surface with gentle tension. Pulling tightly through the stuffing can create dents and change the expression.
Work the mouth in short sections so its curves remain controlled. Add the cheek accents after the eyes and mouth are settled, keeping both sides similar in size.
Exact facial stitch coordinates are not established in these notes; use the finished example as the placement reference.
Attach the Hat and Bow
Place the hat after the ears are positioned. Keep the face and ear bases visible, then secure the hat with small stitches that preserve its crown and brim.
Center the bow beneath the face. Check that both sides remain balanced and that it does not cover the mouth.
Secure the accessory ends inside the main pieces rather than leaving loose strands behind them.
Finishing Checks
Problem What to inspect
The head leans Neck alignment, seam tension, and filling near the join
One ear twists The flattened base and the direction of its attachment stitches
The face has dents Embroidery tension and uneven stuffing
A limb looks higher Attachment position before adding further sewing stitches
The hat loses its shape Tight attachment stitches or a flattened crown
Remove every temporary marker or pin. Inspect the neck, ear bases, limbs, tail, and accessories for loose stitching or exposed stuffing.
Follow the yarn and stuffing care instructions when cleaning. Support the shape and handle the embroidery gently.
Watch the Puppy Crochet Tutorial
Use the video alongside the tables for the joined rounds, flattened ear closures, hat shaping, and assembly. Recheck the conflicting tail caption before completing that piece.
Bring the Little Puppy Together
The crocheted shapes establish the puppy’s proportions, while the finishing gives it personality. Even stuffing supports the rounded head; balanced ears frame the face; and the blue hat and bow connect the small details.
Take time to position everything before sewing permanently. Those final adjustments help the separate pieces become one coordinated little character.
Watch every stitch up close
Pair these written notes with the complete video tutorial.
Made with yarn, shared with love. 🧶💗